
Question & Answer : AC Motor Control Circuits
Electrical Engineering World is the worldwide community with members engaged in the electrical power industry. Mission // ENERGY & POWER FOR ALL!

AC Electric Circuits
Question 1
Perhaps the most
challenging aspect of interpreting ladder diagrams, for people more
familiar with electronic schematic diagrams, is how electromechanical
relays are represented. Compare these two equivalent diagrams:
First, the ladder diagram:
 :
:

Based on your
observations of these two diagrams, explain how electromechanical relays
are represented differently between ladder and schematic diagrams.
One of the most
significant differences is that in ladder diagrams, relay coils and
relay contacts (the normally-open contact in this diagram shown as a
capacitor-like symbol) need not be drawn near each other.
Follow-up question: what do the two labels “L1” and “L2” represent?
Notes:
Discuss these diagrams with your students, noting any significant advantages and disadvantages of each convention.
In reference to the challenge question, the symbols “L1” and “L2” are
very common designations for AC power conductors. Be sure your students
have researched this and know what these labels mean!
Question 2
Interpret this AC motor control circuit diagram, explaining the meaning of each symbol:

Also, explain the
operation of this motor control circuit. What happens when someone
actuates the “Run” switch? What happens when they let go of the “Run”
switch?
In this circuit,
the motor will start once the “Run” switch is actuated. When the “Run”
switch is released, the motor continues to run.
Follow-up
question: this circuit has no “stop” switch! What would have to be
modified in the ladder logic circuit to provide “stop” control?
Notes:
This circuit is known as a latching circuit,
because it “latches” in the “on” state after a momentary action. The
contact in parallel with the “Run” switch is often referred to as a seal-in contact, because it “seals” the momentary condition of the Run switch closure after that switch is de-actuated.
The follow-up question of how we may make the motor stop running is a
very important one. Spend time with your students discussing this
practical design problem, and implement a solution.
Question 3
Draw the necessary wire connections to build the circuit shown in this ladder diagram:
Ladder diagram:

Illustration showing components:


Notes:
This question helps students build their spatial-relations skills, as
they relate a neat, clean diagram to a relatively “messy” real-world
circuit. As usual, the circuit shown here is not the only way it could
have been built, but it is one solution.
Question 4
The simplest and least expensive style of electric motor control is the so-called across-the-line starter. Describe how this motor control circuit functions, and also define the word “starter” in this context.
A “starter” is another name for the large power relay used to conduct current to the motor lines. Starters are also known as contactors, and are usually labeled with the letter “M” in ladder diagrams.
Notes:
Ask your students to identify any motor control circuit diagrams they’ve
already seen as being “across-the-line.” If there are no convenient
motor control circuit diagrams available for illustration, you may want
to ask a student to draw an “across-the-line” starter circuit on the
whiteboard for everyone to see.
Question 5
Although
“across-the-line” motor control circuits are simple and inexpensive,
they are not preferred for starting large motors. An alternative to
across-the-line motor starting is reduced voltage starting. Identify some of the reasons across-the-line starting is undesirable for large electric motors.
I’ll let you research the answers to this question!
Notes:
The reasons for using reduced-voltage starting instead of
across-the-line starting go beyond electrical! Discuss this with your
students.
Question 6
A special type of overcurrent protection device used commonly in motor control circuits is the overload heater. These devices are connected in series with the motor conductors, and heat up slightly under normal current conditions:

Although the “heater” elements are connected in series with the motor lines as fuses would be, they are not fuses!
In other words, it is not the purpose of an overload heater to burn
open under an overcurrent fault condition, although it is possible for
them to do so.
The key to
understanding the purpose of an overload heater is found by examining
the single-phase (L1 / L2) control circuit, where a normally-closed
switch contact by the same name (ÖL”) is connected in series with the
motor relay coil.
How, exactly, do
overload heaters protect an electric motor against “burnout” from
overcurrent conditions? How does this purpose differ from that of fuses
or circuit breakers? Does the presence of overload heaters in this
circuit negate that need for a circuit breaker or regular fuses? Explain
your answers.
When the overload
“heaters” become excessively warm from overcurrent, they trigger the
opening of the ÖL” contact, thus stopping the motor. The heaters do not
take the place of regular overcurrent protection devices (circuit
breakers, fuses), but serve a different purpose entirely. It is the task
of the overload heaters to protect the motor against
overcurrent by mimicking the thermal characteristics of the motor
itself. Circuit breakers and fuses, on the other hand, protect an
entirely different part of the circuit!
Notes:
Ask your students to describe the information they found on overload
heaters through their research. There are different styles and
variations of overload heaters, but they all perform the same function.
Also, be sure to review with your students the purpose of fuses and
circuit breakers. These devices are not intended to protect the load
(motor), but rather another important component of an electrical system!
An interesting way to explain the function of overload heaters is to refer to them as analog models of
the motor windings. They are designed such that at any given current
level, they will take as long to heat up and reach their trip point as
the real motor itself will take to heat up to a point of impending
damage. Likewise, they also cool off at the same rate as the real motor
cools off when no power is applied. Overload heaters are like small
motor-models with a thermostat mechanism attached, to trip the overload
contact at the appropriate time. It is an elegant concept, and quite
practical in real motor control applications.
Question 7
The circuit shown here provides two-direction control (forward and reverse) for a three-phase electric motor:

Explain how the
reversal of motor direction is accomplished with two different motor
starters, M1 and M2. Also, explain why there is only one set of overload
heaters instead of two (one for forward and one for reverse). Finally,
explain the purpose of the normally-closed contacts in series with each
starter coil.
Motor reversal is
accomplished by reversing the phase sequence of the three-phase power
going to the motor (from ABC to ACB). The existence of only one set
(three) heaters may be adequately explained if you consider a scenario
where the motor overheats after being run in the “Forward” direction,
then an immediate attempt is made to run it in “Reverse.” Finally, the
NC contacts (typically called interlock contacts) prevent lots of sparks from flying if both pushbuttons are simultaneously pressed!
Notes:
Ask your students to explain exactly why “sparks [would fly]” if both pushbuttons were pressed at the same time. The name commonly given to the NC contacts is interlock, because each one “locks out” the other starter from being energized.
Question 8
The starter and
overload heater assembly for an industrial electric motor is often
located quite a distance from the motor itself, inside a room referred
to as a motor control center, or MCC:
Since it is
impossible for a technician to be in two places at once, it is often
necessary to perform diagnostic checks on a malfunctioning electric
motor from the MCC where the technician has access to all the control
circuitry.
One such
diagnostic check is line current, to detect the presence of an open
motor winding. If a three-phase motor winding fails open, the motor will
not run as it should. This is called single-phasing.
A good way to check for this condition is to use a clamp-on (inductive)
ammeter to check line current on all three lines while the starter is
energized. This may be done at any location where there is physical
access to the motor power conductors.
Suppose, though,
you are working on a job site where single-phasing is suspected and you
do not have a clamp-on ammeter with you. All you have is a DMM (digital
multimeter), which does not have the ability to safely measure the
motor’s current. You are about to head back to the shop to get a
clamp-on ammeter when a more experienced technician suggests an
alternate test. He takes your DMM, sets it to the AC millivolt range, then connects the test probes to either side of each overload heater element, one heater at a time like this:

Across each overload heater element he measures about 20 mV AC with the
starter engaged. From this he determines that the motor is not single-phasing, but is drawing approximately equal current on all three phases.
Explain how this diagnostic check works, and why this determination can
be made. Also describe what limitations this diagnostic procedure has,
and how a clamp-on ammeter really is the best way to measure motor line
current.
Each overload
heater element possesses a small amount of electrical resistance, which
is the key to this diagnostic procedure. Of course, the measurement
obtained is strictly qualitative, not quantitative as a clamp-on ammeter
would give.
Follow-up question
#1: what sort of result might occur with this diagnostic check if the
motor were indeed single-phasing due to one of the overload heaters
failing open?
Follow-up question
#2: what other causes could there be for a three-phase motor
“single-phasing” other than a motor winding failed open?
Notes:
I have used this diagnostic check more than once to troubleshooting a
single-phasing electric motor. It is amazing what sorts of diagnostic
checks you can do with a high-quality DMM and a sound understanding of
electrical theory!
Question 9
A popular strategy for AC induction motor control is the use of variable frequency drive units,
or VFDs. Explain what varying the frequency of power to an AC induction
motor accomplishes, and why this might be advantageous.
Variable frequency
drives allow for the precise and efficient control of induction motor
speed, which is not possible by other means.
Notes:
Central to the answer of this question is the principle of a rotating magnetic field and
how rotor speed is primarily a function of line frequency. While the
internal details of a VFD are quite complex, the basic operating
principle (and rationale) is not.
Question 10
Shown here is a
typical set of “curves” for an overload heater, such as is commonly used
to provide overcurrent protection for AC electric motors:
Why is there any
time required to re-set an overload heater contact after a “trip”?
Circuit breakers can be re-closed mere moments after a trip with no
problem, and fuses (of course) can be replaced moments after blowing. Is
this an intentional design feature of overload heaters, or just an
idiosyncrasy?
Also, explain why
the reset curve starts to decrease for currents above 300% of the
motor’s full-load rating. Why doesn’t the reset time curve continue to
increase with increasing fault current magnitudes?
The reset time for
an overcurrent heater is an intentional design feature. If the heater
is too hot to re-set, then the motor is too hot to re-start.
Notes:
Remind your students that the purpose of an overload heater is to
provide a thermal analogue of the electric motor itself. Ideally, the
heater heats up and cools down at the exact same rate as the motor. This
explains why there is a necessary reset time after an overload heater
causes the motor control circuit to “trip.”
Ask your students to share the common design features of an overload
heater, from their research. How do these devices actually function? If
your students understand this, they should have no difficulty
understanding why overload heater contacts require time to reset after a
trip.
The reason for the reset time curve decreasing after about 300%
full-load current is a bit more complex to answer. This, as well, is not
an idiosyncrasy, but rather a design feature of the overload heater.
Since greater levels of current will trip the heater in a shorter time,
they actually heat up the motor less during that brief “on” time than a
sustained overcurrent of lesser magnitude. Therefore the motor does not
need to cool down as long prior to the next re-start.
Question 11
Protective relays are
special power-sensing devices whose job it is to automatically open or
close circuit breakers in large electric power systems. Some protective
relays are designed to be used directly with large electric motors to
provide sophisticated monitoring, shut-down, and start-up control.
One of the features of these motor-oriented protective relays is start-up lockout.
What this means is the relay will prevent someone from attempting too
many successive re-starts of a large electric motor. If the motor is
started and stopped several times over a short period of time, the relay
will prevent the person from starting it again until a sufficient
“rest” time has passed.
Explain why a
large electric motor would need to “rest” after several successive
start-up events. If electric motors are perfectly capable of running
continuously at full load for years on end, why would a few start-ups be
worthy of automatic lock-out?
I won’t give you a direct answer here, but I will provide a big hint: inrush current.
Notes:
Inrush current is a factor with every motor
type, AC or DC. It is easy to forget just how substantially larger a
typical motor’s inrush current is compared to its normal full-load
current. When students consider the magnitude of the currents involved,
and also the fact that most electric motors are fan-cooled and therefore
lacking in cooling during the initial moments of a start-up, the reason
for automatic lock-out after several successive start-up events becomes
obvious.
Question 12
Electromechanical
relays used to start and stop high-power electric motors (called
“contactors” or starters”) must be considered a possible source of arc flash. Explain why this is. What is it about the construction or operation of such a relay that invites this dangerous phenomenon?
Electromechanical
relays interrupt circuit current by drawing pairs of metal contacts
apart, separating them with an air gap. Because this contact motion is
not instantaneous, it is possible to generate an arc across the air gaps
of such magnitude that it becomes an arc flash.
Notes:
Arc flash is just as hazardous to electrical technicians as electric
shock, yet I have seen (and worked with) people who pay no attention to
the dangers! It must be understood that motor starters are by their very
nature arc-generating devices, and that under certain unusual
conditions may generate lethal arc flashes. You might want to ask your
students what sorts of unusual conditions could lead to a contactor
producing an actual arc flash (rather than merely a few small sparks).
Question 13
There are several different methods of providing reduced-voltage starting for electric motors. One of them is the autotransformer method. Here is a diagram showing how this works:

“L1,” “L2,” and
“L3” represent the three phase power supply conductors. Three sets of
contacts (R, S, and Y) serve to connect power to the motor at different
times. The starting sequence for the motor is as follows:
- 1. Motor off (R open, S open, Y open)
- 2. Start button pressed (S and Y contacts all close)
- 3. Time delay (depending on the size of the motor)
- 4. Y contacts open
- 5. Time delay (depending on the size of the motor)
- 6. R contacts close, S contacts open
Explain the operation of this system. How do the autotransformers serve to reduce voltage to the electric motor during start-up?
When the “S” and
“Y” contacts are all closed, the autotransformers form a three-phase “Y”
connection, with line voltage (L1, L2, and L3) applied to the “tips” of
the “Y,” and a reduced motor voltage tapped off a portion of each
autotransformer winding.
When the “Y”
contacts open, the three autotransformers now function merely as
series-connected inductors, limiting current with their inductive
reactance.
When the “R” contacts close, the motor receives direct power from L1, L2, and L3.
Follow-up
question: how do the overload heaters function in this circuit? They
aren’t connected in series with the motor conductors as is typical with
smaller motors!
Notes:
For each step of the start-up sequence, it is possible to re-draw the
circuit feeding power to the motor, in order to make its function more
apparent. Do not create these re-drawings yourself, but have your
students draw an equivalent circuit for each step in the start-up
sequence.
The follow-up question is a good review of current transformers (CT), as
well as an introduction to the use of overload heaters in high-current
electrical systems.
Question 14
Identify at least three independent faults that could cause this motor not to start:

For each of the proposed faults, explain why they would prevent the motor from starting.
Here are some possible faults (not an exhaustive list by any means!):
- • Any fuse blown
- • Contactor coil failed open
- • Any transformer winding failed open
- • Broken jumper between H3 and H2 on the transformer
- • Corroded wire connection at terminal A1 or A2
- • Motor winding failed shorted
Follow-up
question: there will be a difference in operation between the L1 fuse
blowing and either the L2 or L3 fuse blowing. Explain what this
difference is, and why it might serve as a clue to what was wrong.
Notes:
Identifying multiple faults should be quite easy in this circuit. The
real value of this question is the opportunity for explanation and
discussion that it generates for your students as they share their
answers with each other.
Question 15
There is something
wrong in this motor control circuit. When the start button is pressed,
the contactor energizes but the motor itself does not run:

Identify a good place to check with your multimeter to diagnose the nature of the fault, and explain your reasoning.
Try checking for
line voltages at the “line” (source) side of the contactor, between
terminals 1 and 2, 2 and 3, and 1 and 3, with the contactor energized
(motor is supposed to be running). I’ll leave it to you to explain why
this is a good place to check first.
Notes:
Discuss with your students the various options they have in diagnostic
steps, and what they think of the step proposed in the answer.
Troubleshooting scenarios such as this as excellent for stimulating
active class discussions, so take advantage of it!
Question 16
Interpret this AC motor control circuit diagram, explaining the meaning of each symbol:

Also, explain the
operation of this motor control circuit. What happens when someone
actuates the “Run” switch? What happens when they let go of the “Run”
switch?
The “Run” switch
is a normally-open pushbutton. Relay coil “M1” is energized by this
switch, and actuates three normally-open contacts (also labeled “M1”) to
send three-phase power to the motor. Note that the details of the power
supply are not shown in these diagrams. This is a common omission, done
for the sake of simplicity.
Notes:
Discuss with your students the sources of electrical power for both
circuits here: the relay control circuit and the motor itself. Challenge
your students to explore this concept by asking them the following
questions:
- • Are the two sources necessarily the same?
- • How does the convention of linking relay coils with contacts by name (rather than by dashed lines and proximity) in ladder diagrams benefit multiple-source circuits such as this one?
- • Do these circuits even have to be drawn on the same page?
Question 17
Identify at least
one fault that would cause the motor to turn off immediately once the
“Start” pushbutton switch was released, instead of “latch” in the run
mode as it should:

For each of your proposed faults, explain why it will cause the described problem.
- • M1 control contact failed open.
- • Wire(s) between M1 control contact and control circuit broken open.
Notes:
This form of motor control circuit is very popular in industry. It is well worth your students’ time to study it and understand both how and why it works.
Question 18
A very common form of latch circuit
is the simple “start-stop” relay circuit used for motor controls,
whereby a pair of momentary-contact pushbutton switches control the
operation of an electric motor. In this particular case, I show a
low-voltage control circuit and a 3-phase, higher voltage motor:

Explain the
operation of this circuit, from the time the “Start” switch is actuated
to the time the “Stop” switch is actuated. The normally-open M1 contact
shown in the low-voltage control circuit is commonly called a seal-in contact. Explain what this contact does, and why it might be called a “seal-in” contact.
Even though the “Start” and “Stop” switches are momentary, the “seal-in” contact makes the circuit latch in one of two states: either motor energized or motor de-energized.
Notes:
Motor “start-stop” circuits are very common in industry, and apply to
applications beyond electric motors. Ask your students if they can think
of any application for a circuit such as this.
Question 19
An alternative to the conventional schematic diagram in AC power control systems is the ladder diagram.
In this convention, the “hot” and “neutral” power conductors are drawn
as vertical lines near the edges of the page, with all loads and switch
contacts drawn between those lines like rungs on a ladder:

As you can see,
the symbolism in ladder diagrams is not always the same as in electrical
schematic diagrams. While some symbols are identical (the toggle
switch, for instance), other symbols are not (the solenoid coil, for
instance).
Re-draw this ladder diagram as a schematic diagram, translating all the symbols into those correct for schematic diagrams.

Notes:
While ladder diagrams have their own unique elegance, it may be
frustrating for some students to have to learn a new diagram convention.
Since ladder diagrams are so common in industry, your students really
have no choice.
Question 20
Draw the necessary wire connections to build the circuit shown in this ladder diagram:
Ladder diagram:

Illustration showing components:

Yes, the “Run”
switch shown in the diagram is a SPST, but the switch shown in the
illustration is a SPDT. This is a realistic scenario, where the only
type of switch you have available is a SPDT, but the wiring diagram
calls for something different. It is your job to improvise a solution!

Challenge question: which switch position (handle to the left or handle to the right) turns the motor on?
Notes:
This question helps students build their spatial-relations skills, as
they relate a neat, clean diagram to a relatively “messy” real-world
circuit. As usual, the circuit shown here is not the only way it could
have been built, but it is one solution.
In reference to the challenge question, the particular style of SPDT
switch shown is very common, and the terminal connections on the bottom
might not be what you would expect from looking at its schematic symbol.
Question 21
Examine this three-phase motor control circuit, where fuses protect against overcurrent and a three-pole relay (called a contactor) turns power on and off to the motor:
After years of
faithful service, one day this motor refuses to start. It makes a
“humming” sound when the contactor is energized (relay contacts close),
but it does not turn. A mechanic checks it out and determines that the
shaft is not seized, but is free to turn. The problem must be electrical
in nature!
You are called to
investigate. Using a clamp-on ammeter, you measure the current through
each of the lines (immediately after each fuse) as another start is once
again attempted. You then record the three current measurements:
Line Current
1 52.7 amps
2 51.9 amps
3 0 amps
Determine at least two possible faults which could account for the motor’s refusal to start and the three current measurements taken. Then, decide what your next measurement(s) will be to isolate the exact location and nature of the fault.
Here are some possibilities:
- • Fuse #3 blown open
- • Third relay contact damaged (failed open) inside the contactor
- • One winding failed open inside the motor (assuming a “Y” winding configuration)
There are several valid “next steps” you could take from this point. Discuss alternatives with your classmates.
Notes:
This is a practical scenario which you and your students should have
some fun exploring. If they have never heard of a “contactor” before,
this question is a good opportunity to introduce the component. Bring
one with you to discussion if you have the opportunity!
Question 22
Working on a job
site with an experienced technician, you are tasked with trying to
determine whether the line currents going to a three-phase electric
motor are balanced. If everything is okay with the motor and the power
circuitry, of course, the three line currents should be precisely equal
to each other.
The problem is,
neither of you brought a clamp-on ammeter for measuring the line
currents. Your multimeters are much too small to measure the large
currents in this circuit, and connecting an ammeter in series with such a
large motor could be dangerous anyway. So, the experienced technician
decides to try something different - he uses his multimeter as an AC
milli-voltmeter to measure the small voltage drop across each fuse,
using the fuses as crude shunt resistors:

He obtains the following measurements:
Line Fuse voltage drop
1 24.3 mV
2 37.9 mV
3 15.4 mV
Do these voltage drop measurements suggest imbalanced motor line currents? Why or why not?
The results are
inconclusive, because resistance for the whole fuse and holder assembly
is not a reliably stable quantity. Corrosion between one of the fuse
ends and the fuse holder clip, for example, would increase resistance
between the points where millivoltage is shown measured.
Follow-up
question: just because the results of these millivoltage measurements
are inconclusive in this scenario does not necessarily mean the
principle of using fuses as current-indicating shunt resistors is
useless. Describe one application where using a fuse as a
current-indicating shunt would yield trustworthy information about the
current.
Challenge
question: determine where you could measure millivoltage, that might be
more reliable in terms of quantitatively indicating line current.
Notes:
While measuring millivoltage across a fuse may
seem like a strange diagnostic technique, it is one I have gainfully
applied for years. The “catch” is you have to know what it is good for
and what it is not. It is not a precise, quantitative technique by any means!
Question 23
One method of
achieving reduced-voltage starting for large electric motors is to
insert series resistances into each of the motor’s power conductors.
When starting, all power must go through the resistors. After the motor
has had time to speed up, another set of “starter” contacts bypass line
power around the resistors, directly to the motor windings.
Draw a diagram
showing how this could be done for a single-phase electric motor, using
two starter contacts: “R” for “run” and “S” for “start”. Hint: you only
need two contacts and one resistor!
None of the control circuitry (start switch, overload contact, starter coil, etc.) is shown in this diagram:

Notes:
If students have studied the autotransformer method of reduced-voltage
starting, ask them to compare this method against that. Certainly, the
resistive method is simpler, but does the autotransformer method have
its own advantage(s)?
Electrical Engineering World is the worldwide community with members engaged in the electrical power industry. Mission // ENERGY & POWER FOR ALL!
AC Electric Circuits
Question 1
Perhaps the most
challenging aspect of interpreting ladder diagrams, for people more
familiar with electronic schematic diagrams, is how electromechanical
relays are represented. Compare these two equivalent diagrams:
First, the ladder diagram:
:
Based on your
observations of these two diagrams, explain how electromechanical relays
are represented differently between ladder and schematic diagrams.
One of the most
significant differences is that in ladder diagrams, relay coils and
relay contacts (the normally-open contact in this diagram shown as a
capacitor-like symbol) need not be drawn near each other.
Follow-up question: what do the two labels “L1” and “L2” represent?
Notes:
Discuss these diagrams with your students, noting any significant advantages and disadvantages of each convention.
In reference to the challenge question, the symbols “L1” and “L2” are
very common designations for AC power conductors. Be sure your students
have researched this and know what these labels mean!
Question 2
Interpret this AC motor control circuit diagram, explaining the meaning of each symbol:
Also, explain the
operation of this motor control circuit. What happens when someone
actuates the “Run” switch? What happens when they let go of the “Run”
switch?
In this circuit,
the motor will start once the “Run” switch is actuated. When the “Run”
switch is released, the motor continues to run.
Follow-up
question: this circuit has no “stop” switch! What would have to be
modified in the ladder logic circuit to provide “stop” control?
Notes:
This circuit is known as a latching circuit,
because it “latches” in the “on” state after a momentary action. The
contact in parallel with the “Run” switch is often referred to as a seal-in contact, because it “seals” the momentary condition of the Run switch closure after that switch is de-actuated.
The follow-up question of how we may make the motor stop running is a
very important one. Spend time with your students discussing this
practical design problem, and implement a solution.
Question 3
Draw the necessary wire connections to build the circuit shown in this ladder diagram:
Ladder diagram:
Illustration showing components:
Notes:
This question helps students build their spatial-relations skills, as
they relate a neat, clean diagram to a relatively “messy” real-world
circuit. As usual, the circuit shown here is not the only way it could
have been built, but it is one solution.
Question 4
The simplest and least expensive style of electric motor control is the so-called across-the-line starter. Describe how this motor control circuit functions, and also define the word “starter” in this context.
A “starter” is another name for the large power relay used to conduct current to the motor lines. Starters are also known as contactors, and are usually labeled with the letter “M” in ladder diagrams.
Notes:
Ask your students to identify any motor control circuit diagrams they’ve
already seen as being “across-the-line.” If there are no convenient
motor control circuit diagrams available for illustration, you may want
to ask a student to draw an “across-the-line” starter circuit on the
whiteboard for everyone to see.
Question 5
Although
“across-the-line” motor control circuits are simple and inexpensive,
they are not preferred for starting large motors. An alternative to
across-the-line motor starting is reduced voltage starting. Identify some of the reasons across-the-line starting is undesirable for large electric motors.
I’ll let you research the answers to this question!
Notes:
The reasons for using reduced-voltage starting instead of
across-the-line starting go beyond electrical! Discuss this with your
students.
Question 6
A special type of overcurrent protection device used commonly in motor control circuits is the overload heater. These devices are connected in series with the motor conductors, and heat up slightly under normal current conditions:
Although the “heater” elements are connected in series with the motor lines as fuses would be, they are not fuses!
In other words, it is not the purpose of an overload heater to burn
open under an overcurrent fault condition, although it is possible for
them to do so.
The key to
understanding the purpose of an overload heater is found by examining
the single-phase (L1 / L2) control circuit, where a normally-closed
switch contact by the same name (ÖL”) is connected in series with the
motor relay coil.
How, exactly, do
overload heaters protect an electric motor against “burnout” from
overcurrent conditions? How does this purpose differ from that of fuses
or circuit breakers? Does the presence of overload heaters in this
circuit negate that need for a circuit breaker or regular fuses? Explain
your answers.
When the overload
“heaters” become excessively warm from overcurrent, they trigger the
opening of the ÖL” contact, thus stopping the motor. The heaters do not
take the place of regular overcurrent protection devices (circuit
breakers, fuses), but serve a different purpose entirely. It is the task
of the overload heaters to protect the motor against
overcurrent by mimicking the thermal characteristics of the motor
itself. Circuit breakers and fuses, on the other hand, protect an
entirely different part of the circuit!
Notes:
Ask your students to describe the information they found on overload
heaters through their research. There are different styles and
variations of overload heaters, but they all perform the same function.
Also, be sure to review with your students the purpose of fuses and
circuit breakers. These devices are not intended to protect the load
(motor), but rather another important component of an electrical system!
An interesting way to explain the function of overload heaters is to refer to them as analog models of
the motor windings. They are designed such that at any given current
level, they will take as long to heat up and reach their trip point as
the real motor itself will take to heat up to a point of impending
damage. Likewise, they also cool off at the same rate as the real motor
cools off when no power is applied. Overload heaters are like small
motor-models with a thermostat mechanism attached, to trip the overload
contact at the appropriate time. It is an elegant concept, and quite
practical in real motor control applications.
Question 7
The circuit shown here provides two-direction control (forward and reverse) for a three-phase electric motor:
Explain how the
reversal of motor direction is accomplished with two different motor
starters, M1 and M2. Also, explain why there is only one set of overload
heaters instead of two (one for forward and one for reverse). Finally,
explain the purpose of the normally-closed contacts in series with each
starter coil.
Motor reversal is
accomplished by reversing the phase sequence of the three-phase power
going to the motor (from ABC to ACB). The existence of only one set
(three) heaters may be adequately explained if you consider a scenario
where the motor overheats after being run in the “Forward” direction,
then an immediate attempt is made to run it in “Reverse.” Finally, the
NC contacts (typically called interlock contacts) prevent lots of sparks from flying if both pushbuttons are simultaneously pressed!
Notes:
Ask your students to explain exactly why “sparks [would fly]” if both pushbuttons were pressed at the same time. The name commonly given to the NC contacts is interlock, because each one “locks out” the other starter from being energized.
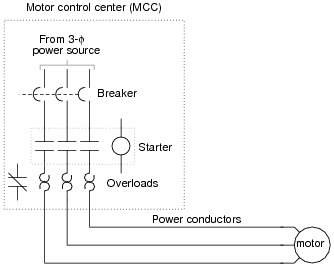
Question 8
The starter and
overload heater assembly for an industrial electric motor is often
located quite a distance from the motor itself, inside a room referred
to as a motor control center, or MCC:
Since it is
impossible for a technician to be in two places at once, it is often
necessary to perform diagnostic checks on a malfunctioning electric
motor from the MCC where the technician has access to all the control
circuitry.
One such
diagnostic check is line current, to detect the presence of an open
motor winding. If a three-phase motor winding fails open, the motor will
not run as it should. This is called single-phasing.
A good way to check for this condition is to use a clamp-on (inductive)
ammeter to check line current on all three lines while the starter is
energized. This may be done at any location where there is physical
access to the motor power conductors.
Suppose, though,
you are working on a job site where single-phasing is suspected and you
do not have a clamp-on ammeter with you. All you have is a DMM (digital
multimeter), which does not have the ability to safely measure the
motor’s current. You are about to head back to the shop to get a
clamp-on ammeter when a more experienced technician suggests an
alternate test. He takes your DMM, sets it to the AC millivolt range, then connects the test probes to either side of each overload heater element, one heater at a time like this:
Across each overload heater element he measures about 20 mV AC with the
starter engaged. From this he determines that the motor is not single-phasing, but is drawing approximately equal current on all three phases.
Explain how this diagnostic check works, and why this determination can
be made. Also describe what limitations this diagnostic procedure has,
and how a clamp-on ammeter really is the best way to measure motor line
current.
Each overload
heater element possesses a small amount of electrical resistance, which
is the key to this diagnostic procedure. Of course, the measurement
obtained is strictly qualitative, not quantitative as a clamp-on ammeter
would give.
Follow-up question
#1: what sort of result might occur with this diagnostic check if the
motor were indeed single-phasing due to one of the overload heaters
failing open?
Follow-up question
#2: what other causes could there be for a three-phase motor
“single-phasing” other than a motor winding failed open?
Notes:
I have used this diagnostic check more than once to troubleshooting a
single-phasing electric motor. It is amazing what sorts of diagnostic
checks you can do with a high-quality DMM and a sound understanding of
electrical theory!
Question 9
A popular strategy for AC induction motor control is the use of variable frequency drive units,
or VFDs. Explain what varying the frequency of power to an AC induction
motor accomplishes, and why this might be advantageous.
Variable frequency
drives allow for the precise and efficient control of induction motor
speed, which is not possible by other means.
Notes:
Central to the answer of this question is the principle of a rotating magnetic field and
how rotor speed is primarily a function of line frequency. While the
internal details of a VFD are quite complex, the basic operating
principle (and rationale) is not.
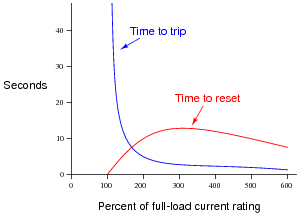
Question 10
Shown here is a
typical set of “curves” for an overload heater, such as is commonly used
to provide overcurrent protection for AC electric motors:
Why is there any
time required to re-set an overload heater contact after a “trip”?
Circuit breakers can be re-closed mere moments after a trip with no
problem, and fuses (of course) can be replaced moments after blowing. Is
this an intentional design feature of overload heaters, or just an
idiosyncrasy?
Also, explain why
the reset curve starts to decrease for currents above 300% of the
motor’s full-load rating. Why doesn’t the reset time curve continue to
increase with increasing fault current magnitudes?
The reset time for
an overcurrent heater is an intentional design feature. If the heater
is too hot to re-set, then the motor is too hot to re-start.
Notes:
Remind your students that the purpose of an overload heater is to
provide a thermal analogue of the electric motor itself. Ideally, the
heater heats up and cools down at the exact same rate as the motor. This
explains why there is a necessary reset time after an overload heater
causes the motor control circuit to “trip.”
Ask your students to share the common design features of an overload
heater, from their research. How do these devices actually function? If
your students understand this, they should have no difficulty
understanding why overload heater contacts require time to reset after a
trip.
The reason for the reset time curve decreasing after about 300%
full-load current is a bit more complex to answer. This, as well, is not
an idiosyncrasy, but rather a design feature of the overload heater.
Since greater levels of current will trip the heater in a shorter time,
they actually heat up the motor less during that brief “on” time than a
sustained overcurrent of lesser magnitude. Therefore the motor does not
need to cool down as long prior to the next re-start.
Question 11
Protective relays are
special power-sensing devices whose job it is to automatically open or
close circuit breakers in large electric power systems. Some protective
relays are designed to be used directly with large electric motors to
provide sophisticated monitoring, shut-down, and start-up control.
One of the features of these motor-oriented protective relays is start-up lockout.
What this means is the relay will prevent someone from attempting too
many successive re-starts of a large electric motor. If the motor is
started and stopped several times over a short period of time, the relay
will prevent the person from starting it again until a sufficient
“rest” time has passed.
Explain why a
large electric motor would need to “rest” after several successive
start-up events. If electric motors are perfectly capable of running
continuously at full load for years on end, why would a few start-ups be
worthy of automatic lock-out?
I won’t give you a direct answer here, but I will provide a big hint: inrush current.
Notes:
Inrush current is a factor with every motor
type, AC or DC. It is easy to forget just how substantially larger a
typical motor’s inrush current is compared to its normal full-load
current. When students consider the magnitude of the currents involved,
and also the fact that most electric motors are fan-cooled and therefore
lacking in cooling during the initial moments of a start-up, the reason
for automatic lock-out after several successive start-up events becomes
obvious.
Question 12
Electromechanical
relays used to start and stop high-power electric motors (called
“contactors” or starters”) must be considered a possible source of arc flash. Explain why this is. What is it about the construction or operation of such a relay that invites this dangerous phenomenon?
Electromechanical
relays interrupt circuit current by drawing pairs of metal contacts
apart, separating them with an air gap. Because this contact motion is
not instantaneous, it is possible to generate an arc across the air gaps
of such magnitude that it becomes an arc flash.
Notes:
Arc flash is just as hazardous to electrical technicians as electric
shock, yet I have seen (and worked with) people who pay no attention to
the dangers! It must be understood that motor starters are by their very
nature arc-generating devices, and that under certain unusual
conditions may generate lethal arc flashes. You might want to ask your
students what sorts of unusual conditions could lead to a contactor
producing an actual arc flash (rather than merely a few small sparks).
Question 13
There are several different methods of providing reduced-voltage starting for electric motors. One of them is the autotransformer method. Here is a diagram showing how this works:
“L1,” “L2,” and
“L3” represent the three phase power supply conductors. Three sets of
contacts (R, S, and Y) serve to connect power to the motor at different
times. The starting sequence for the motor is as follows:
- 1. Motor off (R open, S open, Y open)
- 2. Start button pressed (S and Y contacts all close)
- 3. Time delay (depending on the size of the motor)
- 4. Y contacts open
- 5. Time delay (depending on the size of the motor)
- 6. R contacts close, S contacts open
Explain the operation of this system. How do the autotransformers serve to reduce voltage to the electric motor during start-up?
When the “S” and
“Y” contacts are all closed, the autotransformers form a three-phase “Y”
connection, with line voltage (L1, L2, and L3) applied to the “tips” of
the “Y,” and a reduced motor voltage tapped off a portion of each
autotransformer winding.
When the “Y”
contacts open, the three autotransformers now function merely as
series-connected inductors, limiting current with their inductive
reactance.
When the “R” contacts close, the motor receives direct power from L1, L2, and L3.
Follow-up
question: how do the overload heaters function in this circuit? They
aren’t connected in series with the motor conductors as is typical with
smaller motors!
Notes:
For each step of the start-up sequence, it is possible to re-draw the
circuit feeding power to the motor, in order to make its function more
apparent. Do not create these re-drawings yourself, but have your
students draw an equivalent circuit for each step in the start-up
sequence.
The follow-up question is a good review of current transformers (CT), as
well as an introduction to the use of overload heaters in high-current
electrical systems.
Question 14
Identify at least three independent faults that could cause this motor not to start:
For each of the proposed faults, explain why they would prevent the motor from starting.
Here are some possible faults (not an exhaustive list by any means!):
- • Any fuse blown
- • Contactor coil failed open
- • Any transformer winding failed open
- • Broken jumper between H3 and H2 on the transformer
- • Corroded wire connection at terminal A1 or A2
- • Motor winding failed shorted
Follow-up
question: there will be a difference in operation between the L1 fuse
blowing and either the L2 or L3 fuse blowing. Explain what this
difference is, and why it might serve as a clue to what was wrong.
Notes:
Identifying multiple faults should be quite easy in this circuit. The
real value of this question is the opportunity for explanation and
discussion that it generates for your students as they share their
answers with each other.
Question 15
There is something
wrong in this motor control circuit. When the start button is pressed,
the contactor energizes but the motor itself does not run:
Identify a good place to check with your multimeter to diagnose the nature of the fault, and explain your reasoning.
Try checking for
line voltages at the “line” (source) side of the contactor, between
terminals 1 and 2, 2 and 3, and 1 and 3, with the contactor energized
(motor is supposed to be running). I’ll leave it to you to explain why
this is a good place to check first.
Notes:
Discuss with your students the various options they have in diagnostic
steps, and what they think of the step proposed in the answer.
Troubleshooting scenarios such as this as excellent for stimulating
active class discussions, so take advantage of it!
Question 16
Interpret this AC motor control circuit diagram, explaining the meaning of each symbol:
Also, explain the
operation of this motor control circuit. What happens when someone
actuates the “Run” switch? What happens when they let go of the “Run”
switch?
The “Run” switch
is a normally-open pushbutton. Relay coil “M1” is energized by this
switch, and actuates three normally-open contacts (also labeled “M1”) to
send three-phase power to the motor. Note that the details of the power
supply are not shown in these diagrams. This is a common omission, done
for the sake of simplicity.
Notes:
Discuss with your students the sources of electrical power for both
circuits here: the relay control circuit and the motor itself. Challenge
your students to explore this concept by asking them the following
questions:
- • Are the two sources necessarily the same?
- • How does the convention of linking relay coils with contacts by name (rather than by dashed lines and proximity) in ladder diagrams benefit multiple-source circuits such as this one?
- • Do these circuits even have to be drawn on the same page?
Question 17
Identify at least
one fault that would cause the motor to turn off immediately once the
“Start” pushbutton switch was released, instead of “latch” in the run
mode as it should:
For each of your proposed faults, explain why it will cause the described problem.
- • M1 control contact failed open.
- • Wire(s) between M1 control contact and control circuit broken open.
Notes:
This form of motor control circuit is very popular in industry. It is well worth your students’ time to study it and understand both how and why it works.
Question 18
A very common form of latch circuit
is the simple “start-stop” relay circuit used for motor controls,
whereby a pair of momentary-contact pushbutton switches control the
operation of an electric motor. In this particular case, I show a
low-voltage control circuit and a 3-phase, higher voltage motor:
Explain the
operation of this circuit, from the time the “Start” switch is actuated
to the time the “Stop” switch is actuated. The normally-open M1 contact
shown in the low-voltage control circuit is commonly called a seal-in contact. Explain what this contact does, and why it might be called a “seal-in” contact.
Even though the “Start” and “Stop” switches are momentary, the “seal-in” contact makes the circuit latch in one of two states: either motor energized or motor de-energized.
Notes:
Motor “start-stop” circuits are very common in industry, and apply to
applications beyond electric motors. Ask your students if they can think
of any application for a circuit such as this.
Question 19
An alternative to the conventional schematic diagram in AC power control systems is the ladder diagram.
In this convention, the “hot” and “neutral” power conductors are drawn
as vertical lines near the edges of the page, with all loads and switch
contacts drawn between those lines like rungs on a ladder:
As you can see,
the symbolism in ladder diagrams is not always the same as in electrical
schematic diagrams. While some symbols are identical (the toggle
switch, for instance), other symbols are not (the solenoid coil, for
instance).
Re-draw this ladder diagram as a schematic diagram, translating all the symbols into those correct for schematic diagrams.
Notes:
While ladder diagrams have their own unique elegance, it may be
frustrating for some students to have to learn a new diagram convention.
Since ladder diagrams are so common in industry, your students really
have no choice.
Question 20
Draw the necessary wire connections to build the circuit shown in this ladder diagram:
Ladder diagram:
Illustration showing components:
Yes, the “Run”
switch shown in the diagram is a SPST, but the switch shown in the
illustration is a SPDT. This is a realistic scenario, where the only
type of switch you have available is a SPDT, but the wiring diagram
calls for something different. It is your job to improvise a solution!
Challenge question: which switch position (handle to the left or handle to the right) turns the motor on?
Notes:
This question helps students build their spatial-relations skills, as
they relate a neat, clean diagram to a relatively “messy” real-world
circuit. As usual, the circuit shown here is not the only way it could
have been built, but it is one solution.
In reference to the challenge question, the particular style of SPDT
switch shown is very common, and the terminal connections on the bottom
might not be what you would expect from looking at its schematic symbol.
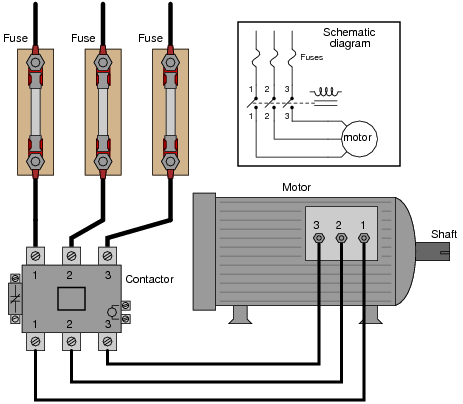
Question 21
Examine this three-phase motor control circuit, where fuses protect against overcurrent and a three-pole relay (called a contactor) turns power on and off to the motor:
After years of
faithful service, one day this motor refuses to start. It makes a
“humming” sound when the contactor is energized (relay contacts close),
but it does not turn. A mechanic checks it out and determines that the
shaft is not seized, but is free to turn. The problem must be electrical
in nature!
You are called to
investigate. Using a clamp-on ammeter, you measure the current through
each of the lines (immediately after each fuse) as another start is once
again attempted. You then record the three current measurements:
Line Current
1 52.7 amps
2 51.9 amps
3 0 amps
Determine at least two possible faults which could account for the motor’s refusal to start and the three current measurements taken. Then, decide what your next measurement(s) will be to isolate the exact location and nature of the fault.
Here are some possibilities:
- • Fuse #3 blown open
- • Third relay contact damaged (failed open) inside the contactor
- • One winding failed open inside the motor (assuming a “Y” winding configuration)
There are several valid “next steps” you could take from this point. Discuss alternatives with your classmates.
Notes:
This is a practical scenario which you and your students should have
some fun exploring. If they have never heard of a “contactor” before,
this question is a good opportunity to introduce the component. Bring
one with you to discussion if you have the opportunity!
Question 22
Working on a job
site with an experienced technician, you are tasked with trying to
determine whether the line currents going to a three-phase electric
motor are balanced. If everything is okay with the motor and the power
circuitry, of course, the three line currents should be precisely equal
to each other.
The problem is,
neither of you brought a clamp-on ammeter for measuring the line
currents. Your multimeters are much too small to measure the large
currents in this circuit, and connecting an ammeter in series with such a
large motor could be dangerous anyway. So, the experienced technician
decides to try something different - he uses his multimeter as an AC
milli-voltmeter to measure the small voltage drop across each fuse,
using the fuses as crude shunt resistors:
He obtains the following measurements:
Line Fuse voltage drop
1 24.3 mV
2 37.9 mV
3 15.4 mV
Do these voltage drop measurements suggest imbalanced motor line currents? Why or why not?
The results are
inconclusive, because resistance for the whole fuse and holder assembly
is not a reliably stable quantity. Corrosion between one of the fuse
ends and the fuse holder clip, for example, would increase resistance
between the points where millivoltage is shown measured.
Follow-up
question: just because the results of these millivoltage measurements
are inconclusive in this scenario does not necessarily mean the
principle of using fuses as current-indicating shunt resistors is
useless. Describe one application where using a fuse as a
current-indicating shunt would yield trustworthy information about the
current.
Challenge
question: determine where you could measure millivoltage, that might be
more reliable in terms of quantitatively indicating line current.
Notes:
While measuring millivoltage across a fuse may
seem like a strange diagnostic technique, it is one I have gainfully
applied for years. The “catch” is you have to know what it is good for
and what it is not. It is not a precise, quantitative technique by any means!
Question 23
One method of
achieving reduced-voltage starting for large electric motors is to
insert series resistances into each of the motor’s power conductors.
When starting, all power must go through the resistors. After the motor
has had time to speed up, another set of “starter” contacts bypass line
power around the resistors, directly to the motor windings.
Draw a diagram
showing how this could be done for a single-phase electric motor, using
two starter contacts: “R” for “run” and “S” for “start”. Hint: you only
need two contacts and one resistor!
None of the control circuitry (start switch, overload contact, starter coil, etc.) is shown in this diagram:
Notes:
If students have studied the autotransformer method of reduced-voltage
starting, ask them to compare this method against that. Certainly, the
resistive method is simpler, but does the autotransformer method have
its own advantage(s)?


No comments